カスタムユニット
カスタムユニットを複数作成したい場合には、ユニットを拡張することも可能です。カスタムユニットがひとつだけの場合でも拡張する場合と同じファイル構成で問題なく作成でき、将来的な拡張に備えることができますので、「ユニットを拡張する」記事もぜひ合わせてお読みください。
カスタムユニットを使えば、コンテンツの内容に合わせたオリジナルのユニットを作成できます。カスタムフィールドでは、ユニットとユニットの間に挿入できませんが、カスタムユニットでは挿入できるので、管理画面の表現の幅が広がります。

カスタムユニットの例
Ver.2.7.27より、カスタムユニットでもフィールドグループが使用可能になりました。
カスタムユニットのフィールドグループの例
検索について
カスタムユニットはカスタムフィールド とは違い、カスタムフィールド検索には対応していません。カスタムユニットのフィールドグループも同様です。
他のユニットと同様、キーワード検索(全文検索)は対応しています。
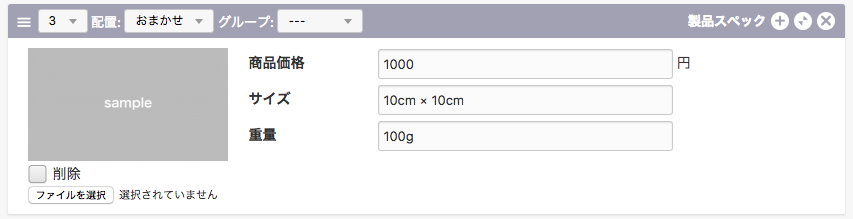
カスタムユニットを使う方法
編集設定画面にボタンを追加する
カスタムユニットを利用するには、管理画面内のコンフィグの編集設定のページから、モードをカスタムに設定しているボタンを追加する必要があります。
図のようにモードのセレクトボックスから「カスタム」を選択し、それに対するラベル名を決めてください(※ラベル名は、エントリー編集の際のユニット追加ボタンのラベルとして使用されます)。
保存ボタンをクリックして、設定を保存します。

現段階のカスタムユニットの状態
この段階でエントリー編集画面に移動し、エントリーの編集画面からユニットの追加ボタンを押しても、まだカスタマイズをしていないので空っぽのユニットが表示されるだけとなります。

入力フォームのカスタマイズ
次に、このユニットの部分に表示するカスタムユニットの入力フォームのカスタマイズ方法についてご説明します。
まずはカスタムフィールドを設置するためのファイルを作成します。カスタムユニットの入力フォームをカスタマイズするときには、/themes/自分のテーマ/admin/entryの中に、unitディレクトリを作り、custom.html(Ver.2.1.1.4以前をお使いの方は/admin/entryの中にcustom-unit.html)というファイルを作成してください。
作成したファイルに、カスタムユニットの入力フォームのソースコードを記述していきます(カスタムフィールドメーカー等を使って作成した入力用フォームを使うことが記述ミスが少なくなり、おすすめです)。
ご自身でカスタムフィールドまたはカスタムフィールドグループのソースコードから作成される際には以下の3つの点をご注意ください。
- 変数指定の箇所の後に{id}を付加する
- @グループ名の後ろに{id}を付加する(フィールドグループの場合)
- field[]をunit{id}[]にする
例:カスタムユニットl(custom.html、またはVer.2.1.1.4以前はcustom-unit.html)
<!-- BEGIN product_image:veil -->
<div class="column-image- acms-admin-col-4">
<!-- BEGIN_IF [{product_image@path}/nem] -->
<img src="%{ARCHIVES_DIR}{product_image@path}" alt="" width="200" class="productImage">
<input type="hidden" name="product_image{id}@old" value="{product_image@path}"><br>
<div class="acms-admin-form-checkbox">
<input type="checkbox" name="product_image{id}@edit" value="delete" id="input-checkbox-product_image{id}">
<label for="input-checkbox-product_image{id}">
<i class="acms-admin-ico-checkbox"></i>削除
</label>
</div>
<!-- END_IF -->
<input type="file" name="product_image{id}" size="20">
<input type="hidden" name="unit{id}{id}[]" value="product_image{id}">
<input type="hidden" name="product_image{id}:extension" value="image">
<input type="hidden" name="product_image{id}@size" value="300">
<input type="hidden" name="product_image{id}@filename" value="">
</div><!-- END product_image:veil -->
<!-- BEGIN custom_table:veil -->
<div class="acms-admin-col-8">
<table class="customTable entryFormColumnTable">
<!-- BEGIN product_price:veil -->
<tr>
<th>商品価格</th>
<td><input type="text" name="product_price{id}" value="{product_price}" class="acms-admin-form-width-3quarters" placeholder="1,000"> 円
<input type="hidden" name="unit{id}{id}[]" value="product_price{id}"></td>
</tr><!-- END product_price:veil -->
<!-- BEGIN product_price:veil -->
<tr>
<th>サイズ</th>
<td><input type="text" name="product_size{id}" value="{product_size}" class="acms-admin-form-width-3quarters" placeholder="10cm x 10cm">
<input type="hidden" name="unit{id}{id}[]" value="product_size{id}"></td>
</tr><!-- END product_price:veil -->
<!-- BEGIN product_price:veil -->
<tr>
<th>重量</th>
<td><input type="text" name="product_amount{id}" value="{product_amount}" class="acms-admin-form-width-3quarters" placeholder="100g">
<input type="hidden" name="unit{id}{id}[]" value="product_amount{id}"></td>
</tr><!-- END product_price:veil -->
</table>
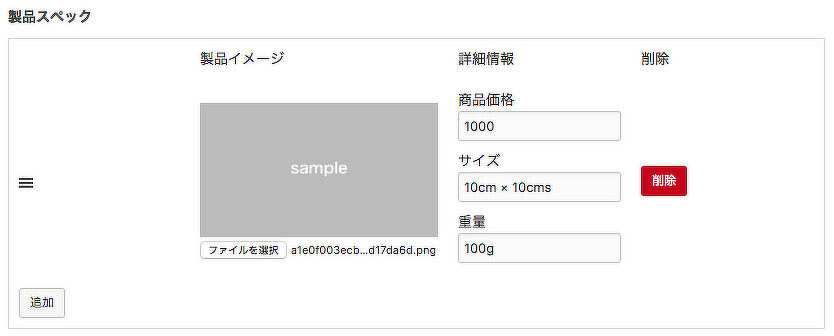
</div><!-- END custom_table:veil -->例:カスタムユニットのフィールドグループ(Ver. 2.7.27 以上で使用可能です)

<h2 class="acms-admin-admin-title2">製品スペック</h2>
<table class="js-fieldgroup-sortable adminTable acms-admin-table-admin-edit">
<thead class="acms-admin-hide-sp">
<tr>
<th class="acms-admin-table-left acms-admin-admin-config-table-item-handle"> </th>
<th class="acms-admin-table-left">製品イメージ</th>
<th class="acms-admin-table-left">詳細情報</th>
<th class="acms-admin-table-left acms-admin-admin-config-table-action">削除</th>
</tr>
</thead>
<tbody>
<!-- BEGIN group_product:loop -->
<tr class="sortable-item">
<td class="item-handle"><i class="acms-admin-icon-sort"></i></td>
<td class="js-img_resize_cf">
<!-- BEGIN_IF [{product_image@path}/nem] -->
<div>
<img src="%{ARCHIVES_DIR}{product_image@path}" class="js-img_resize_preview" style="width:300px;">
</div>
<input type="hidden" name="product_image{id}@old[]" value="{product_image@path}" />
<!-- ELSE -->
<div>
<img src="" class="js-img_resize_preview" style="width:300px;display:none;">
</div>
<!-- END_IF -->
<input type="file" name="product_image{id}[]" class="js-img_resize_input" /><br />
<input type="hidden" name="product_image{id}@size[]" value="300" />
</td>
<td>
<div class="acms-admin-margin-bottom-small">
<label for="product_price">商品価格</label>
<input type="text" name="product_price{id}[]" value="{product_price}" id="product_price" class="acms-admin-form-width-full"/>
</div>
<div class="acms-admin-margin-bottom-small">
<label for="product_size">サイズ</label>
<input type="text" name="product_size{id}[]" value="{product_size}" id="product_size" class="acms-admin-form-width-full"/>
</div>
<div class="acms-admin-margin-bottom-small">
<label for="product_amount">重量</label>
<input type="text" name="product_amount{id}[]" value="{product_amount}" id="product_amount" class="acms-admin-form-width-full"/>
</div>
</td>
<td><input type="button" class="item-delete acms-admin-btn-admin acms-admin-btn-admin-danger" value="削除" /></td>
</tr>
<!-- END group_product:loop -->
<tr class="sortable-item item-template">
<td class="item-handle"><i class="acms-admin-icon-sort"></i></td>
<td class="js-img_resize_cf">
<img src="" style="display:none;width:300px;" class="js-img_resize_preview"/>
<input type="file" name="product_image{id}[]" class="js-img_resize_input" /><br />
<input type="hidden" name="product_image{id}@size[]" value="300" />
</td>
<td>
<div class="acms-admin-margin-bottom-small">
<label for="product_price">商品価格</label>
<input type="text" name="product_price{id}[]" value="" id="product_price" class="acms-admin-form-width-full"/>
</div>
<div class="acms-admin-margin-bottom-small">
<label for="product_size">サイズ</label>
<input type="text" name="product_size{id}[]" value="" id="product_size" class="acms-admin-form-width-full"/>
</div>
<div class="acms-admin-margin-bottom-small">
<label for="product_amount">重量</label>
<input type="text" name="product_amount{id}[]" value="" id="product_amount" class="acms-admin-form-width-full"/>
</div>
</td>
<td><input type="button" class="item-delete acms-admin-btn-admin acms-admin-btn-admin-danger" value="削除" /></td>
</tr>
</tbody>
<tfoot>
<tr><td colspan="6"><input type="button" class="item-insert acms-admin-btn-admin" value="追加" /></td>
</tr>
</tfoot>
</table>
<input type="hidden" name="@group_product{id}[]" value="product_image{id}@alt" />
<input type="hidden" name="@group_product{id}[]" value="product_image{id}@path" />
<input type="hidden" name="@group_product{id}[]" value="product_image{id}@x" />
<input type="hidden" name="@group_product{id}[]" value="product_image{id}@y" />
<input type="hidden" name="@group_product{id}[]" value="product_image{id}@edit" />
<input type="hidden" name="@group_product{id}[]" value="product_image{id}@old" />
<input type="hidden" name="product_image{id}:extension" value="image" />
<input type="hidden" name="@group_product{id}[]" value="product_image{id}" />
<input type="hidden" name="unit{id}[]" value="product_image{id}" />
<input type="hidden" name="@group_product{id}[]" value="product_price{id}" />
<input type="hidden" name="unit{id}[]" value="product_price{id}" />
<input type="hidden" name="@group_product{id}[]" value="product_size{id}" />
<input type="hidden" name="unit{id}[]" value="product_size{id}" />
<input type="hidden" name="@group_product{id}[]" value="product_amount{id}" />
<input type="hidden" name="unit{id}[]" value="product_amount{id}" />
<input type="hidden" name="unit{id}[]" value="@group_product{id}" />開発段階のカスタムフィールドメーカーを使うのではなく、ご自身で作成する場合
現段階ではカスタムフィールドグループで各項目を生成し、以下の3つの項目を修正してください。
- 変数指定の箇所の後に{id}を付加する(例:product_size{id}[]、product_image{id}@old[]など)
- @グループ名の後ろに{id}を付加する(例:@group_product{id}[]など)
- field[]をunit{id}[]にする
出力内容のカスタマイズ
例:カスタムユニット(custom.html、またはVer.2.1.1.4以前はcustom-unit.html)
カスタムユニットの出力内容を実装していきます。カスタムユニットの出力内容をカスタマイズするときには、/themes/自分のテーマ/includeの中に、unitディレクトリを作りcustom.htmlというファイルを作成してください。
※Ver. 2.1.1.4以前をお使いの方は/themes/自分のテーマ/include/の中にcustom-unit.htmlというファイルを作成してください。
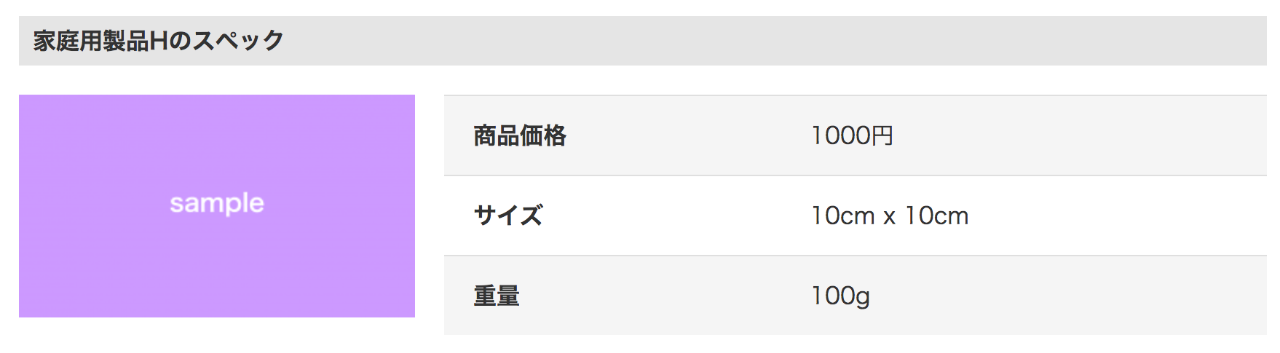
出力内容の例
<h3 id="custom_unit-{utid}">%{ENTRY_TITLE}のスペック</h3>
<!-- BEGIN product_image:veil -->
<div class="column-image-left js_notStyle acms-col-md-4">
	<img src="%{ARCHIVES_DIR}{product_image@path}" alt="" />
</div><!-- END product_image:veil -->
<!-- BEGIN custom_table:veil -->
<div class="acms-col-md-8">
	<div class="entry-container">
		<table class="customTable">
			<!-- BEGIN product_price:veil -->
			<tr>
				<th>商品価格</th>
				<td>{product_price}円</td>
			</tr><!-- END product_price:veil -->
			<!-- BEGIN product_price:veil -->
			<tr>
				<th>サイズ</th>
				<td>{product_size}</td>
			</tr><!-- END product_price:veil -->
			<!-- BEGIN product_price:veil -->
			<tr>
				<th>重量</th>
				<td>{product_amount}</td>
			</tr><!-- END product_price:veil -->
		</table>
	</div>
</div><!-- END custom_table:veil -->
例:フィールドグループ
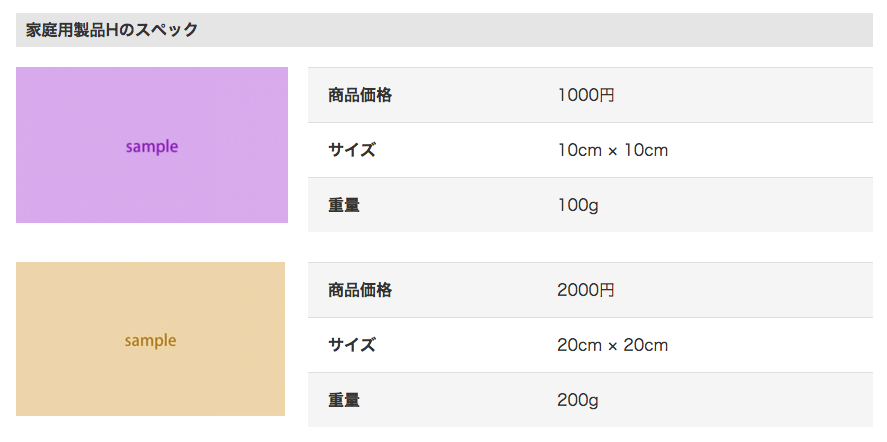
<h3 id="custom_unit-{utid}">%{ENTRY_TITLE}のスペック</h3>
<!-- BEGIN group_product:loop -->
<!-- BEGIN product_image:veil -->
<div class="column-image-left js_notStyle acms-col-md-4">
	<img src="%{ARCHIVES_DIR}{product_image@path}" alt="" />
</div><!-- END product_image:veil -->
<!-- BEGIN custom_table:veil -->
<div class="acms-col-md-8">
	<div class="entry-container">
		<table class="customTable">
			<!-- BEGIN product_price:veil -->
			<tr>
				<th>商品価格</th>
				<td>{product_price}円</td>
			</tr><!-- END product_price:veil -->
			<!-- BEGIN product_price:veil -->
			<tr>
				<th>サイズ</th>
				<td>{product_size}</td>
			</tr><!-- END product_price:veil -->
			<!-- BEGIN product_price:veil -->
			<tr>
				<th>重量</th>
				<td>{product_amount}</td>
			</tr><!-- END product_price:veil -->
		</table>
	</div>
</div><!-- END custom_table:veil -->
<!-- END group_product:loop -->
出力内容のテンプレートはカスタムフィールドのテンプレートと同じように変数を挿入するだけで出力されます。
フィールドグループの場合は、<!-- BEGIN xx:loop --><!-- END xx:loop -->の記述をループ処理をしたい箇所の前後に追加してください。
デベロッパーサイトのカスタムフィールドメーカーを使用する
管理画面用のカスタムユニットのHTMLを手作業で記述することは、項目数が増えると手間がかかります。そこで、カスタムユニットのHTMLの生成を簡単にするカスタムフィールドメーカーにカスタムユニットの作成機能を追加で用意しました。
カスタムフィールドメーカーを使えばカスタムユニットの編集用に使用するラジオボタンや、画像等をアップロードできるHTMLをボタン操作のみで生成することができます。
カスタムフィールドメーカーで設置できる項目
カスタムフィールドメーカーでは下記の項目のHTMLを出力できます。
- テキスト
- テキストエリア
- セレクトボックス
- ラジオボタン
- ファイル
- 画像
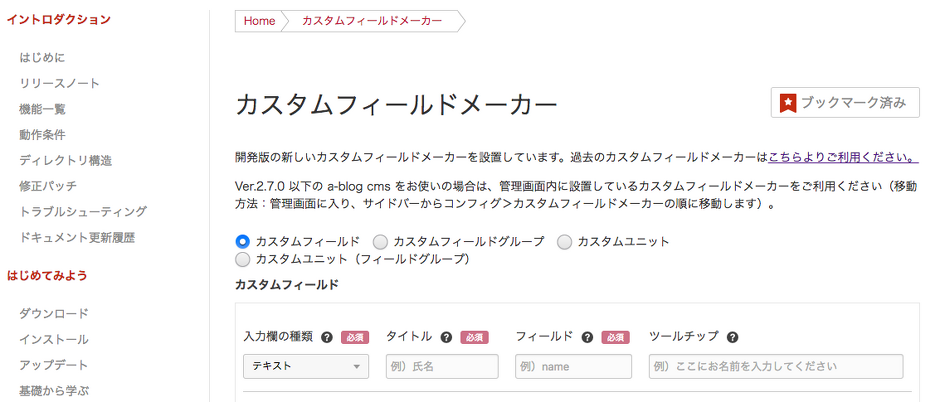
カスタムフィールドメーカーの場所
カスタムフィールドメーカーはVer.2.5よりa-blog cmsの管理画面、および本デベロッパーサイト内に設置されています。本デベロッパーサイト内のドキュメントのリファレンスよりカスタムフィールドメーカーを選択すると移動できます。是非サイト制作にお役立てください。
カスタムフィールドメーカーの使い方
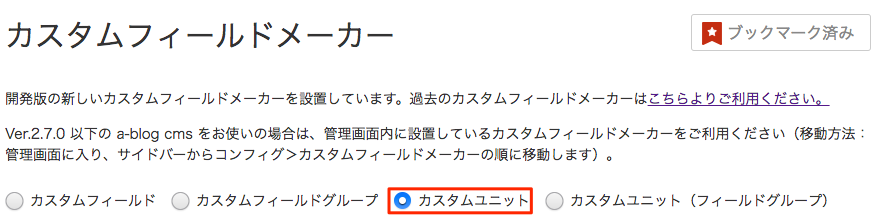
1.まず、ラジオボタンを選択します。カスタムユニットをご使用の場合は「カスタムユニット」を選択します。
2.つぎに、入力欄の種類を選びます。
3.テキストを選択するとタイトルとフィールドという入力フォームが現れますので値を入力してください。[生成]ボタンをクリックすると、カスタムユニットのHTMLが生成されます。
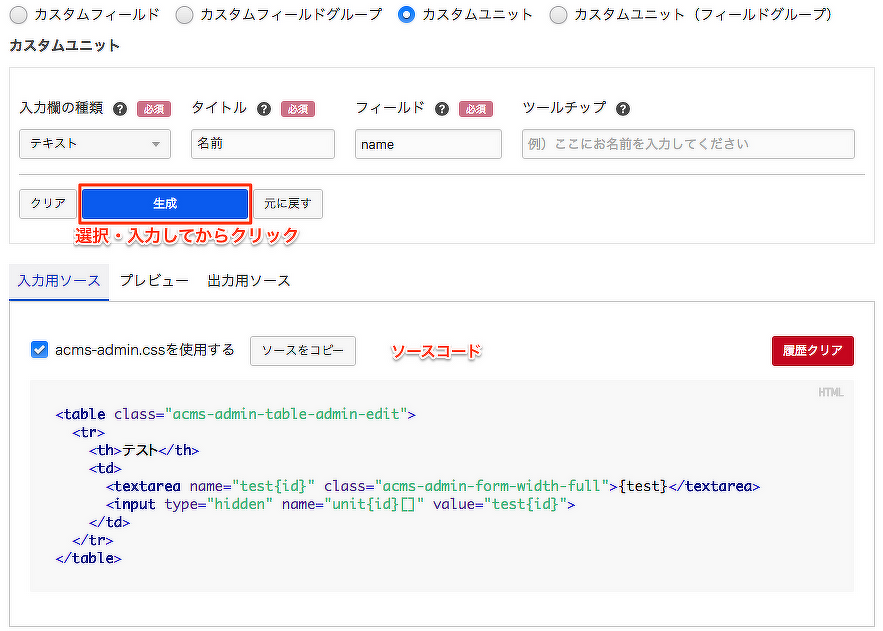
生成されたHTMLコードを、/themes/自分のテーマ/admin/entry/unit/の中のcustom.htmlにペーストしてご使用ください。
(※Ver. 2.1.1.4以前をお使いの方は/themes/自分のテーマ/admin/entry/の中にcustom-unit.htmlというファイルを作成して、コードを貼付けてご使用ください)